TensorFlow支持Ubuntu、Mac OS X、Windows,也支持从源码安装。本文以Ubuntu操作系统为例,来讲解TensorFlow的环境搭建过程。
TensorFlow分为两个版本:
- CPU支持版本如果系统没有安装GPU,那么只能使用TensorFlow的CPU支持版本。
- GPU支持版本如果系统安装了GPU,并且添加了其他相关支持(安装CUDA Toolkit、cuDNN、libcupti-dev库等),则可以使用TensorFlow的GPU支持版本。
TensorFlow可以从以下方式安装:
- virtualenv安装
- 原生的pip安装
- Docker安装
- Anaconda安装
- 从源码安装
在Ubuntu上安装TensorFlow
首先,查看系统版本:
$ cat /etc/lsb-release
DISTRIB_ID=Ubuntu
DISTRIB_RELEASE=14.04
DISTRIB_CODENAME=trusty
DISTRIB_DESCRIPTION="Ubuntu 14.04.5 LTS"
由于没有安装GPU支持,因此只能在Ubuntu系统上安装TensorFlow的CPU支持版本。
其次,查看python和pip:

这里,采用Anaconda中的pip来安装,对应python2版本:
pip install tensorflow
安装完毕,我们可以使用python交互式终端运行下面代码:
>>> import tensorflow as tf
>>> sess = tf.Session()
>>> hello = tf.constant('hello world!')
>>> print(sess.run(hello))
hello world!
Python2与Python3的版本切换
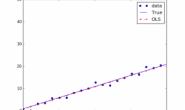
我们来测试TensorFlow官方的一段代码:
import numpy as np
import tensorflow as tf

'''
tf.estimator
'''

x_train = np.array([1., 2., 3., 4.])
y_train = np.array([0., -1., -2., -3.])
x_eval = np.array([2., 5., 8., 1.])
y_eval = np.array([-1.01, -4.1, -7, 0.])
input_fn = tf.estimator.inputs.numpy_input_fn(
    {"x": x_train}, y_train, batch_size=4, num_epochs=None, shuffle=True)
train_input_fn = tf.estimator.inputs.numpy_input_fn(
    {"x": x_train}, y_train, batch_size=4, num_epochs=1000, shuffle=False)
eval_input_fn = tf.estimator.inputs.numpy_input_fn(
    {"x": x_eval}, y_eval, batch_size=4, num_epochs=1000, shuffle=False)

feature_columns = [tf.feature_column.numeric_column("x", shape=[1])]
estimator = tf.estimator.LinearRegressor(feature_columns=feature_columns)

estimator.train(input_fn=input_fn, steps=1000)

train_metrics = estimator.evaluate(input_fn=train_input_fn)
eval_metrics = estimator.evaluate(input_fn=eval_input_fn)
print("train metrics: %r"% train_metrics)
print("eval metrics: %r"% eval_metrics)
将测试代码写进Test.py脚本,在python2环境下,运行结果如下:

程序会报错,指出来tf.estimator模块下不存在LinearRegressor属性。
为什么会出现这个问题呢?我想可能是Python2下的tensorflow库中一些上层接口功能没有跟进,而且考虑到Python2版本到2020年会停止支持,因此Google官方可能对Python3下的tensorflow库支持会更全面一些。既然这样,从Python2环境切换到Python3环境,是一个避免这些问题的办法。
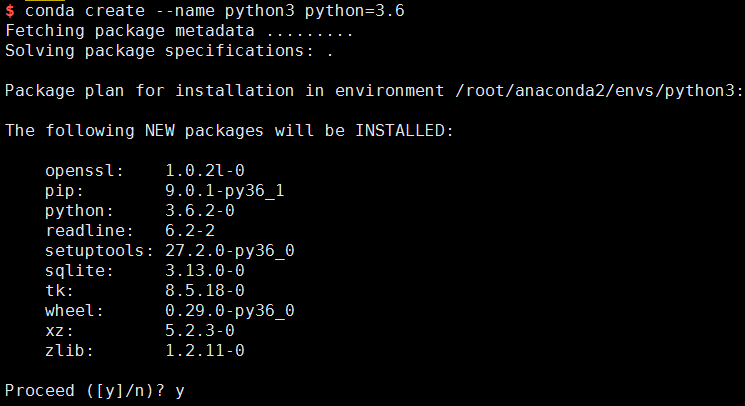
与Virualenv类似,Anaconda支持搭建Python的虚拟环境,也就是说,无论Anaconda是基于Python2版本还是Python3版本,我们都可以搭建Python的双版本共存环境,根据项目需要,随时可以切换版本。
搭建Python3环境:
激活python3环境,并运行Test.py:
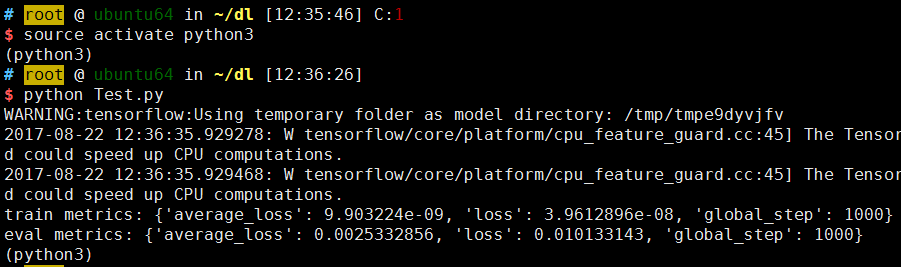
运行成功!
转载请注明:宁哥的小站 » 深度学习之TensorFlow环境搭建